Order Status
Contact us
01926 463 107

My account

Sign in with your credentials, or register for a new account
When you log out, all unsaved projects and your shopping cart will be deleted for security reasons.

The beginner's guide to the CEWE Creator Software

From download to design to checkout, we explain all the features of the CEWE Creator Software and take you through creating your first CEWE PHOTOBOOK.

CREATE NOW

A step-by-step guide to creating your first photo book

By following these simple instructions, you'll learn how to craft a flawless CEWE PHOTOBOOK with the CEWE Creator Software.

1. Download the CEWE Creator Software

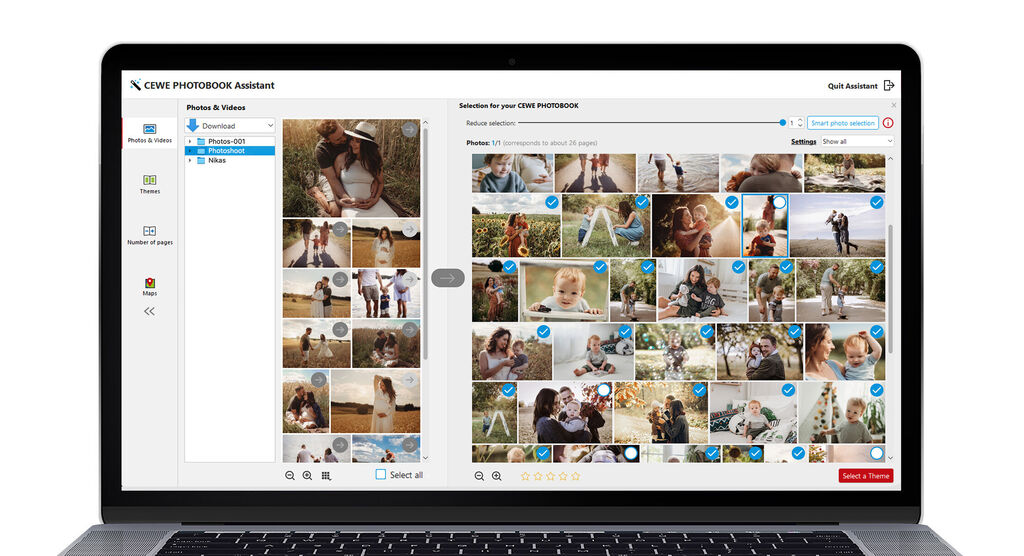
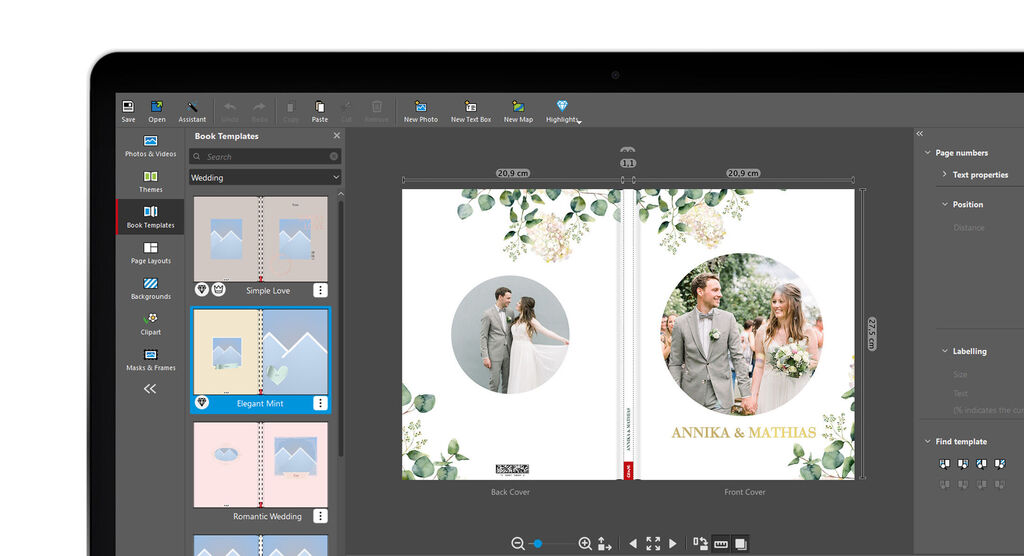
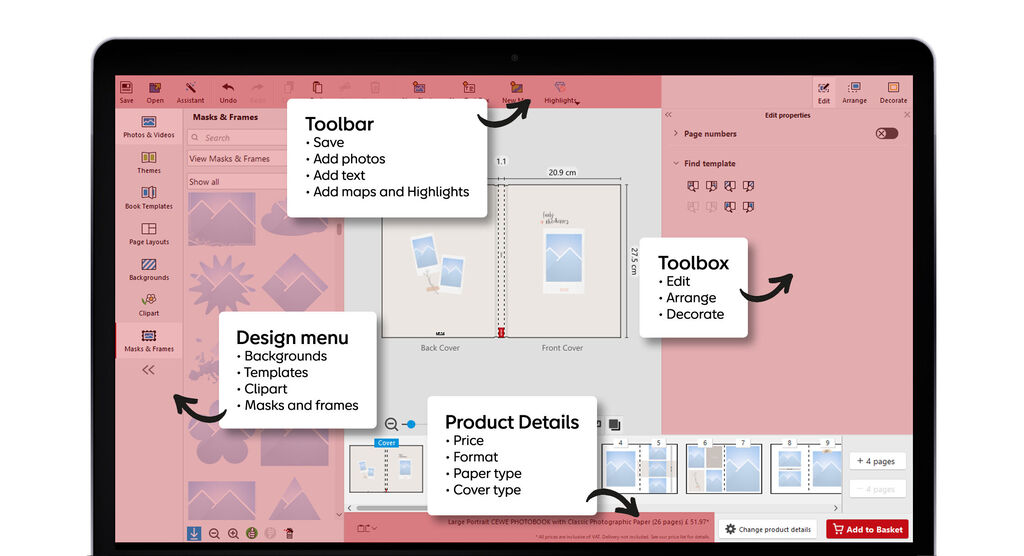
For designing your CEWE PHOTOBOOK, we suggest using the CEWE Creator Software. The software allows you to compose your pages creatively and edit your photos with ease. Additionally, you can save your projects and order your creations using the software. It's free to download for Windows, Mac and Linux. Once you've downloaded the file, open it and follow the installation instructions.

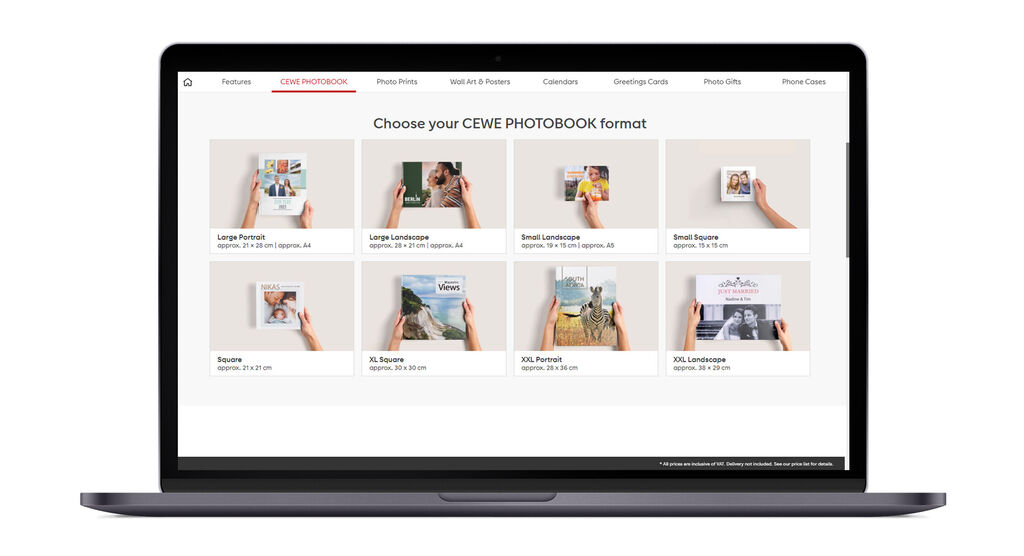
2. Choose format and orientation

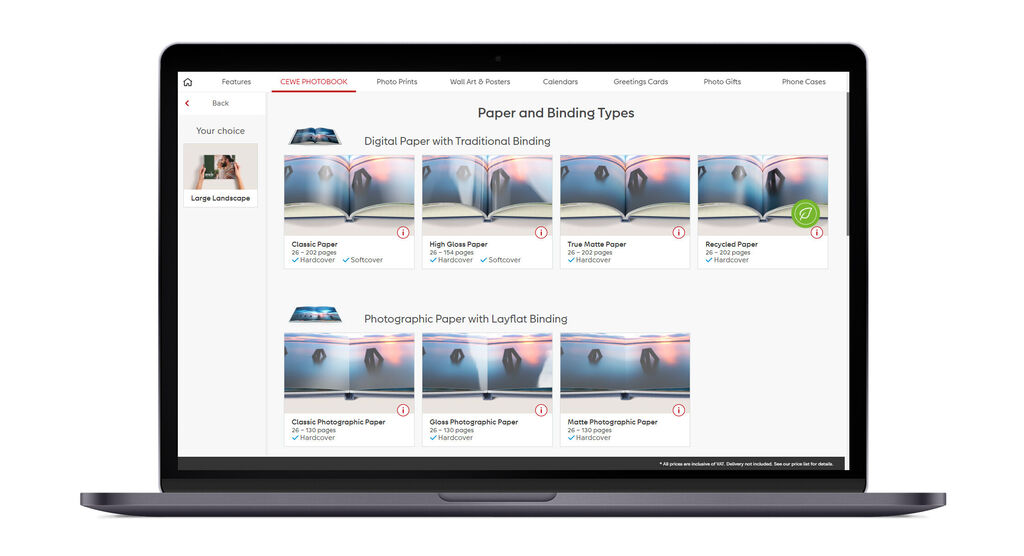
Select the format of the CEWE PHOTOBOOK you would like to make. You have the freedom to select the size, number of pages, cover and paper that best suits your preferences. You can choose between portrait, landscape and square formats and adjust the size accordingly. It's important to note that once you have selected the orientation, you won't be able to change it during the design process. However, you can modify the number of pages, paper type, book size and cover at any point while designing.

Download the CEWE Creator Software

Top tip: Discover the possibilities with the CEWE Creator Software

You can easily import your photos into the CEWE Creator Software from multiple sources, including your PC, external storage media or CEWE myPhotos. The software provides an array of book templates, ready-made styles and layouts, as well as the assistant to offer comprehensive design support. With a vast selection of clipart, backgrounds, masks and frames at your disposal, you can let your creativity run free and design a stunning photo book – even if you are a beginner in photo book design.

3. Select paper type and cover type

When deciding on paper type, you have two main options: digital printing or photographic paper. There's also a choice between a glossy or matte finish for your paper types. Tip: To really make your photos shine, choose our photographic paper for layflat binding, for a photo book that captures your memories seamlessly across a double page.

The cover type will depend on the book's format, with options including Leather, Linen, Booklet, Softcover or Hardcover. The Hardcover provides the most design freedom and is available for all formats. As with the page design, you can enhance your cover with photos and texts and include elements with Silver, Gold, Rose Gold or Gloss Highlights. Remember to keep the spine's lettering in mind when creating your cover. Please note that Leather and Linen covers are only available in combination with Matte Photographic Paper and Gloss Photographic Paper and for the XL Square and XXL Landscape formats.

ORDER PAPER SWATCHES

Top tip: Get organised – Tips for sorting and preparing your photos

Before you start creating your CEWE PHOTOBOOK, it is advisable to prepare beforehand. One of the most essential steps is organising your photo collection. You can sort your photos by date, event, location, people or any other relevant criteria. Once you've sorted your photos, you can go through them again and select the ones that you think would be right for your photo book. This way, you can work more efficiently and create your perfect photo book.

4. Plan your pages with CEWE PHOTOBOOK Assistant

When it comes to creating your own photo book, you have a couple of options. Firstly, you can opt to design everything yourself from scratch. Alternatively, you can choose to use the CEWE PHOTOBOOK Assistant, which is a fantastic option if you're new to photo book design, need some guidance and are looking to create an easy photo book. It offers smart photo selection and intelligent photo distribution, giving you a great starting point that you can then customise to your liking. Whether you use the assistant or choose not to, you'll have access to helpful tools like styles, layouts and themed templates that you can select at the beginning of your design journey or later on from the design menu on the left.

5. Select and edit photos

To edit and select photos in the CEWE Creator Software, start by importing your photos from your PC or cloud services such as Dropbox or CEWE myPhotos. You can do this by dragging them into the Photos & Videos selection area on the left. Once your photos are imported, you can drag and drop the desired image onto the desired page. If you need to edit a photo, simply double-click on it. You can change the size and aspect ratio of your photos by using the blue handles, while the toolbar on the right allows you to edit font, size and alignment of texts.

How to use the CEWE Creator Software Assistant to create a photo book

Follow along as you make your masterpiece using our our simplest way to create!

Top tip: Try a right-click

When designing your CEWE PHOTOBOOK using the CEWE Creator Software, right-clicking is a useful tool that provides access to many helpful functions.

6. Start designing with templates, themes and layouts

Once you're ready to start designing, you have three options to choose from in the design menu on the left.

  1. Book Templates are fully designed photo books with ready-made layouts, backgrounds and design elements that you can customise by simply filling in the placeholders with your photos and text.

  2. Themes refer to pre-designed page backgrounds that come with appropriate layouts. You have the option to apply Themes to multiple pages or make changes to specific elements on a page.

  3. With Page Layouts, you can determine how many photos are used per page. All you have to do is fill in the placeholders with photos.

Each option can be individually adapted to suit your preferences, making the creative process easy and enjoyable.

Download the CEWE Creator Software

Top tip: Photo Book Templates – Professional designs guaranteed to impress

If you're new to designing photo books and want to achieve a polished look quickly, pre-designed templates are an excellent option for you. To access these templates, simply go to the "Book Templates" section in the design menu on the left side of the screen. You'll find a variety of designs tailored to different occasions. Once you've found a template that meets your needs, drag it into your photo book and add your own photos to the placeholders. The best part is that you can customise all the elements to your liking, making it easy to create a personalised and professional-looking photo book.

7. Get creative with Backgrounds, Clipart and Frames

Let's dive into the finer details of your design. To add a fitting background, head to the design menu on the left-hand side. You'll be able to browse through options sorted by occasion and topic. Once you've found the perfect background and photos, simply drag and drop them onto the appropriate page. For a touch of fun, Clipart is available in the design menu on the left. These small images, stickers, characters and symbols can be placed anywhere on your workspace and adjusted to your liking. Masks can also be used to alter the shape of your photos and give them a unique design. To add a subtle Frame to your photos, use the toolbox to choose a colour and shade that complements your design.

Add Highlights to text and Clipart

When designing your cover, you can enhance specific elements or text with eye-catching Highlights in Gold, Silver, Rose Gold, or Gloss finishes. To add this effect to text, just select the text and choose the desired effect from the upper toolbar. For Clipart, select the appropriate finish from the design menu on the left and drag the element onto your CEWE PHOTOBOOK. Keep in mind that Highlights are easily noticeable during the design process due to their shimmering effect.

LEARN ABOUT HIGHLIGHTS

8. Preview design and complete order

To ensure that your design is flawless, we recommend using our comprehensive checklist:

  • Are there empty placeholders?
  • Are all photos aligned correctly, or has something shifted?
  • Are the image sections correct?
  • Is the resolution of the photos sufficient?
  • Pay attention to the colour of the smileys in the toolbox on the right side of your screen, as they indicate the quality of your images. Red, for example, indicates low image resolution.
  • Have any photos accidentally been inserted twice?
  • Are the cover and spine laid out correctly?
  • Are there any spelling mistakes?
  • We suggest having someone else proofread your work to ensure that it is error-free.

Complete your order

Once you have gone through the checklist, simply head to the bottom right corner of your screen and click on the shopping cart icon labelled "Add to Basket". If there are any discrepancies in your photo book, you will receive a notification. Assuming all is well, you will then be directed to your shopping cart. After that, proceed to checkout and input your billing address and payment method. In the last step, you can review your order one final time before placing it.

BROWSE ALL PHOTO BOOKS

Top tip: Start creating with the CEWE Creator Software today

Ready to begin crafting your very own CEWE PHOTOBOOK? It's easy to get started with the CEWE Creator Software and explore the wide range of design options available. You can save your progress at any point and undo any changes you're not satisfied with. If you need assistance, you’ll always find helpful tips and instructions on our website, and our customer service team is available to answer any questions or concerns. Enjoy the design process, and let your creativity soar!